1.结合junit加载数据源
开发、测试、生产都有各自的数据库,这样需要配置的数据源不一样。
每次部署时修改配置过于繁琐,此时,
可以使用Spring的Profile来配置多个数据源,运行前指定需要加载的数据源即可。 采用spring结合junit做演示,使用oracle和mysql做数据源区别演示,
Profile名指定为oracle和mysql,junit测试时,
使用@ActiveProfiles(
"mysql"),@ActiveProfiles("oracle")来指定需要加载的数据源。
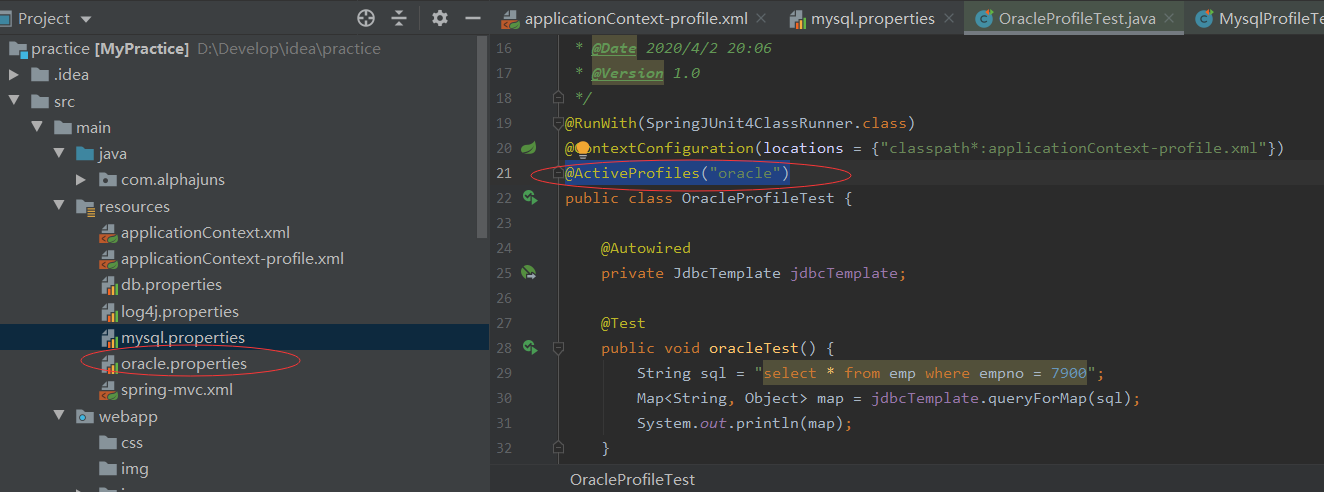
ps:激活指定Profile,junit使用@ActiveProfiles("oracle")
2.了解Profile
(1)Spring中的Profile定义
     Spring中的Profile功能其实早在Spring 3.1的版本就已经出来,它可以理解为我们在Spring容器中所定义的Bean的逻辑组名称,只有当这些Profile被激活的时候,才会将Profile中所对应的Bean注册到Spring容器中。
举个更具体的例子,我们以前所定义的Bean,当Spring容器一启动的时候,
就会一股脑的全部加载这些信息完成对Bean的创建;而使用了Profile之后,
它会将Bean的定义进行更细粒度的划分,将这些定义的Bean划分为几个不同的组,
当Spring容器加载配置信息的时候,首先查找激活的Profile,
然后只会去加载被激活的组中所定义的Bean信息,
而不被激活的Profile中所定义的Bean定义信息是不会加载用于创建Bean的。
(2)使用Profile
由于我们平时在开发中,通常会出现在开发的时候使用一个开发数据库,
测试的时候使用一个测试的数据库,而实际部署的时候需要一个数据库。
以前的做法是将这些信息写在一个配置文件中,当我把代码部署到测试的环境中,
将配置文件改成测试环境;当测试完成,项目需要部署到现网了,
又要将配置信息改成现网的,真的好烦。。。
而使用了Profile之后,我们就可以分别定义3个配置文件,
一个用于开发、一个用户测试、一个用户生产,
其分别对应于3个Profile。当在实际运行的时候,
只需给定一个参数来激活对应的Profile即可,
那么容器就会只加载激活后的配置文件,
这样就可以大大省去我们修改配置信息而带来的烦恼。
(3)配置Spring profile
在介绍完Profile以及为什么要使用它之后,
下面让我们以一个例子来演示一下Profile的使用,
这里还是使用传统的XML的方式来完成Bean的装配。
第一步:Maven依赖
由于只是做一个简单演示,因此无需引入Spring其他模块中的内容,
只需引入核心的4个模块+测试模块即可
<properties>
        <project.build.sourceEncoding>UTF-8</project.build.sourceEncoding>
        <!--指定Spring版本,该版本必须等于3.1-->
        <>.4.RELEASE</>
        <!--指定JDK编译环境-->
        <>1.7</>
    </properties>

    <dependencies>
        <dependency>
            <groupId>org.springframework</groupId>
            <artifactId>spring-core</artifactId>
            <version>${}</version>
        </dependency>

        <dependency>
            <groupId>org.springframework</groupId>
            <artifactId>spring-beans</artifactId>
            <version>${}</version>
        </dependency>

        <dependency>
            <groupId>org.springframework</groupId>
            <artifactId>spring-context</artifactId>
            <version>${}</version>
        </dependency>

        <dependency>
            <groupId>org.springframework</groupId>
            <artifactId>spring-expression</artifactId>
            <version>${}</version>
        </dependency>


        <dependency>
            <groupId>org.springframework</groupId>
            <artifactId>spring-test</artifactId>
            <version>${}</version>
            <scope>test</scope>
        </dependency>

        <dependency>
            <groupId>junit</groupId>
            <artifactId>junit</artifactId>
            <version>2</version>
            <scope>test</scope>
        </dependency>
    </dependencies>


    <build>
        <plugins>
            <plugin>
                <groupId>org.apache.maven.plugins</groupId>
                <artifactId>maven-compiler-plugin</artifactId>
                <version>2.3.2</version>
                <configuration>
                    <source>${}</source>
                    <target>${}</target>
                </configuration>
            </plugin>
        </plugins>
    </build>
第二步:例子代码
package com.panlingxiao.spring.profile.service;

/**
 * 定义接口,在实际中可能是一个数据源
 * 在开发的时候与实际部署的时候分别使用不同的实现
 */publicinterface HelloService {

    public String sayHello();
}
定义生产环境使用的实现类
package ;
import org.springframework.beans.factory.annotation.Value;
import org.springframework.stereotype.Component;
import com.panlingxiao.spring.profile.service.HelloService;

/**
 * 模拟在生产环境下需要使用的类
 */
@Component
publicclass ProduceHelloService implements HelloService {

    //这个值读取生产环境下的配置注入
    @Value("#{}")
    private String name;

    public String sayHello() {
        return String.format("hello,I'm %s,this is a produce environment!",
                name);
    }
}
模拟在开发环境下需要使用的类
package ;
import org.springframework.beans.factory.annotation.Value;
import org.springframework.stereotype.Component;

import com.panlingxiao.spring.profile.service.HelloService;

/**
 * 模拟在开发环境下使用类
 */
@Component
publicclass DevHelloService implements HelloService{

    //这个值是读取开发环境下的配置文件注入
    @Value("#{}")
    private String name;

    public String sayHello() {
        return String.format("hello,I'm %s,this is a development environment!", name);
    }
}
定义配置Spring配置文件
<?xml version="" encoding="UTF-8"?>
<beans xmlns=""
    xmlns:xsi="" xmlns:context=""
    xmlns:util=""
    xsi:schemaLocation=" /spring-beans-.xsd
        http://www.springframework.org/schema/context /spring-context-.xsd
        http://www.springframework.org/schema/util /spring-util-.xsd">

    <!-- 定义开发的profile -->
    <beans profile="development">
        <!-- 只扫描开发环境下使用的类 -->
        <context:component-scan base-package="" />
        <!-- 加载开发使用的配置文件 -->
        <util:properties id="config" location="classpath:dev/"/>
    </beans>

    <!-- 定义生产使用的profile -->
    <beans profile="produce">
        <!-- 只扫描生产环境下使用的类 -->
        <context:component-scan
            base-package="" />
        <!-- 加载生产使用的配置文件 -->
        <util:properties id="config" location="classpath:produce/"/>
    </beans>
</beans>
说明:
开发使用的配置文件,dev/
name=Tomcat
生产使用的配置文件,produce/
name=Jetty
编写测试类
package com.panlingxiao.spring.profile.test;
import org.junit.Test;
import org.junit.runner.RunWith;
import org.springframework.beans.factory.annotation.Autowired;
import org.springframework.test.context.ActiveProfiles;
import org.springframework.test.context.ContextConfiguration;
import org.springframework.test.context.junit4.SpringJUnit4ClassRunner;

import com.panlingxiao.spring.profile.service.HelloService;

@RunWith(SpringJUnit4ClassRunner.class)
@ContextConfiguration(locations="classpath:")
/*
 * 使用注册来完成对profile的激活,
 * 传入对应的profile名字即可,可以传入produce或者dev
 */
@ActiveProfiles("produce")
publicclass TestActiveProfile {

    @Autowired
    private HelloService hs;

    @Test
    publicvoid testProfile() throws Exception {
        String value = ();
        System.out.println(value);
    }
}
3.部署时指定Profile
第一步:
   配置不同环境的配置文件
   建立对应的环境目录,我这里有三个环境分别是,
dev/test/pro 对应 开发/测试/生产。
建好目录后将相应的配置文件放到对应的环境目录中
第二步:配置 设置 profile
这里通过 activeByDefault 将开发环境设置为默认环境。
如果你是用 idea 开发的话,在右侧 maven projects > Profiles 可以勾选对应的环境。
<profiles>
    <profile>
        <!-- 本地开发环境 -->
        <id>dev</id>
        <properties>
            <>dev</>
        </properties>
        <activation>
            <activeByDefault>true</activeByDefault>
        </activation>
    </profile>
    <profile>
        <!-- 测试环境 -->
        <id>test</id>
        <properties>
            <>test</>
        </properties>
    </profile>
    <profile>
        <!-- 生产环境 -->
        <id>pro</id>
        <properties>
            <>pro</>
        </properties>
    </profile>
</profiles>
第三步:打包时根据环境选择配置目录
<plugin>
    <groupId>org.apache.maven.plugins</groupId>
    <artifactId>maven-war-plugin</artifactId>
    <version>3.1.0</version>
    <configuration>
        <warSourceExcludes>
            config/test/**,config/pro/**,config/dev/**
        </warSourceExcludes>
        <webResources>
            <resource>
                <directory>src/main/webapp/config/${}</directory>
                <targetPath>config</targetPath>
                <filtering>true</filtering>
            </resource>
        </webResources>
    </configuration>
</plugin>
第四步:根据环境打包
## 开发环境打包
mvn clean package -P dev

## 测试环境打包
mvn clean package -P test

## 生产环境打包
mvn clean package -P pro
4.配置profile (yml文件)
.全局配置文件
  (1)或者
  (2)固定位置:
        配置文件存放在src/main/resources目录或者类路径/config下;


 (1)Profile定义:
        Profile是Spring对不同环境提供不同配置功能的支持,
        可以通过激活,指定参数等方式快速切换环境;
 (2)多Profile文件
         主配置文件的文件名,可以是application-{profile}.properties;
         默认使用的配置;
         在配置文件中,使用application.=dev激活使用;

(3)yml支持的多文档块方式
server:
port: 8081
spring:
profiles:
active: prod # 激活生产环境
---
# 测试环境
server:
port: 8083
spring:
profiles: dev
---
# 生产环境
server:
port: 8084
spring:
profiles: prod学习来源:
//测试时加载数据源
//了解Profile
//部署时指定Profile
//配置profile properties文件
//配置profile yml文件